
A Holiday Meal that Restores
posted on
November 18, 2025
The chicken growing and processing season is behind us and my focus now moves onto our season of Winter rest, slower days, and the holiday season. This holiday season I am (very much) looking forward to making and eating delicious meals for and with our family and friends - made with mostly local food, responsibly grown by farmers I know and love.
I can think of few better ways to celebrate the end of another growing season and the joy of family and friends than with the most wholesome and delicious foods available to us!
Since I've been brainstorming Thanksgiving meal ideas, I thought I'd get some of these ideas together in one place to share with you. These are holiday meal ideas using various Restoration Acres pastured meats. Although I have not tried all of these recipes, each one sounds amazing and I'm certain they would be a big hit among your family and friends!
Happy menu planning!
-Rachel
Appetizers
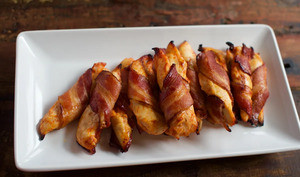
Bacon Wrapped Chicken Tenders
Ingredients
- (2 tsp) salt
- (2 tsp) ground cayenne pepper (omit if you don't like spicy!)
- (2 tsp) paprika
- (2 tsp) garlic powder
- (1 tsp) onion powder
- (2 lbs) Chicken Tenders
- (2 lbs) Smoked Bacon
Directions
Preheat oven to 425F.
In large bowl or zipper bag, dump all the spices and shake or stir to blend. Add chicken and shake or toss to coat evenly.
Take each tender and wrap with a slice of bacon. If you would like to make "bites", cut tenders into 2 pieces and slice bacon in half lengthwise, one half for each bite.
Place each piece onto a rimmed baking sheet fitted with a rack to elevate that chicken pieces off of the pan.
Bake for 35 minutes or until bacon is crispy.
________________________________________
Smokey Chicken Heart & Liver Pate

Ingredients
- (1 lb) chicken hearts and livers
- (1 lb) jowl bacon
- (3) large onions, sliced
- (4) cloves garlic, minced
- salt and pepper, to taste
- (1/2 cup) grass-fed butter, softened
Directions
Cook jowl bacon in large, heavy bottom skillet or pot. Remove slices to cool and leave fat in the skillet.
Add hearts, livers and onion to skillet. Sauté until cooked through. Add garlic and cook 3 minutes more.
Season with salt and pepper (just remember that jowl is already salted. You can always add more salt at the end if needed!)
Add jowl slices, heart and liver mixture, butter, and any leftover fat from the skillet to a food processor. Process until smooth. Taste and add more salt and pepper if needed.
Transfer to glass container and allow to cool. Cover with a lid and keep refrigerated. Pate is best served completely cooled, spread on your favorite bread, crackers or vegetables.
________________________________________
Sage Sausage Balls
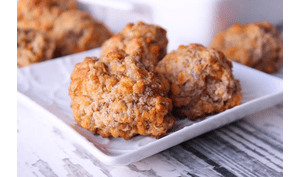
Ingredients
- (1 1/4 cups) all purpose flour
- (1/2 tsp) salt
- (1/2 tsp) black pepper
- (1/2 tsp) onion powder
- (1 1/2 tsp) baking powder
- (2 cups) grated sharp cheddar cheese (not pre-shredded!)
- (1 lb) ground breakfast sausage
- (3 tbsp) unsalted butter, melted
- (1/4 cup) whole milk
Directions
Preheat oven to 400F. In a large mixing bowl, stir together the flour, salt, pepper, onion powder and baking powder.
Add the cheese and toss until coated.
Add the sausage, melted butter, and milk. Mix well.
Form mixture into 1-inch balls and place on a large lightly greased baking sheet.
Bake for 20-25 minutes until browned and cooked through. Serve immediately.
Adapted from https://www.browniebites.net Course
Spatchcocked Fresh Herb & Apple Cider Turkey
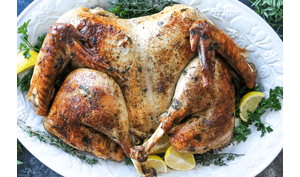
Ingredients
- (1) whole turkey, spatchcocked
- (3 large) onions, quartered
- (1) lemon, zested and quartered (divided)
- (2) bay leaves
- (1/2) bottle hard apple cider
- (1 cup) olive oil
- (4 cloves) garlic, minced
- (2 tbsp) salt
- (several sprigs) fresh rosemary, thyme and parsley, chopped
Directions
Preheat oven to 325F.
Pat turkey dry with paper towels.
In a small bowl, mix olive oil, garlic, lemon zest, salt, rosemary, thyme and parsley to make a paste. Rub all over turkey, including the underside.
Place quartered onions, lemon and bay leaves in the bottom of a large roasting pan. Pour half a bottle of hard cider in bottom of pan.
Lay spatchcocked turkey, skin side up, on top of onions and lemon.
Bake at 325 for 7-8 minutes per pound or until internal temperature at deepest part of breast reaches 150F and thigh reaches 165F.
________________________________________
Pineapple Maple Glazed Ham
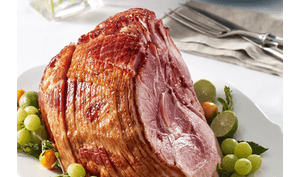
Ingredients
- (3-4 lb) smoked ham
- (1/2 cup) pineapple juice
- (1/2 cup) water
- (1/4 cup) unsalted butter
- (1/2 cup) brown sugar
- (1/2 cup) maple syrup
- (1 1/2 tbsp) dijon mustard
- (1/4 tsp) ground cinnamon
- (1/8 tsp) ground cloves
- (3) garlic cloves, smashed
Directions
Preheat oven to 300F
Using a sharp knife, score a 1 inch wide diamond pattern over the entire ham (don't cut more than 1/4 inch deep).
Place ham in a 9x12 baking dish. Pour pineapple juice and water into the base of the pan. Cover ham with foil and bake for 30 minutes.
Meanwhile, heat the butter in a small saucepan over medium heat until golden brown. Add in the brown sugar, maple syrup, mustard , cinnamon and ground cloves. Continue stirring until the brown sugar has dissolved (about 2 mins).
Reduce heat to low, add the garlic and bring to a simmer. Set aside and let cool to a lukewarm temp (the glaze should be the consistency of room temperature honey).
After 30 min bake time, carefully remove ham from oven. Increase oven temp to 425F. Pour 1/3 of the glaze all over the ham, brushing in between the cuts.
Return to oven and bake uncovered for 15 minutes.
Remove from oven, brush with another 1/3 of the glaze and some of the pan juices, and repeat again after 15 more minutes of baking until a dark golden-brown crust as formed (about 30 mins total).
If your crust is not dark enough after suggested baking time, turn on the broiler and allow to broil for 2-5 minutes. Be sure to keep an eye on it though so the sugar doesn't burn!
Let ham rest 10-20 minutes before slicing.
Adapted from https://cafedelites.com Apple Cinnamon Sausage Stuffing
Sourdough Stuffing with Sausage
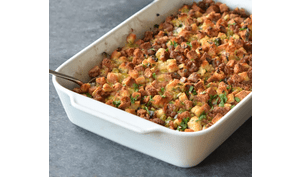
Ingredients
for the homemade bread cubes:
- (24 oz) sourdough bread, sliced 1 inch thick and torn into 1/2 inch pieces
- (3 tbsp) unsalted butter, melted
- (3) cloves garlic, minced
- (3 tbsp) finely chopped fresh herbs (sage, thyme, etc)
- (3/4 tsp) salt
for the sausage stuffing:
- (3 tbsp) unsalted butter
- (1) large yellow onion, diced
- (3) ribs celery, finely diced
- (3) cloves garlic, minces
- (1 1/2 lbs) garlic sausage or breakfast sausage
- (3 tbsp) fresh sage leaves, finely chopped
- (3 tbsp) fresh thyme leaves
- (1 tbsp) fresh rosemary, finely chopped
- (3) large eggs, whisked
- (2-3 cups) chicken stock, divided
- salt and pepper, to taste
Directions
Preheat the oven to 425F. Line 2 large baking sheets with parchment paper or foil for easy cleanup. Lightly grease a 9×13-inch baking dish. Set aside.
Divide the torn sourdough bread pieces across the 2 baking sheets.
In a small bowl, whisk together the butter, garlic, herbs & kosher salt. Drizzle the garlic herb butter over the bread & use your hands to toss to coat. Arrange the bread in an even layer on the baking sheets. Bake 10-12 minutes, until the bread dries out slightly. Do not let the bread get too, too browned at this point – a nice, light golden brown is perfect. Remove from the oven & set aside to cool.
Meanwhile, as the bread toasts, brown the sausage. Add the butter to a large pan over medium heat. Once melted, add the onion & celery. Season with 1/2 teaspoon kosher salt & cook, stirring occasionally, for 5-7 minutes, until softened. Add in the garlic & cook 1-2 minutes more, until fragrant. Add in the sausage. Continue to cook, using a wooden spoon to break the sausage into bite-sized pieces as it cooks, until cooked through, 5-6 minutes. Remove from the heat.
Decrease the oven temperature to 350 degrees F. Place the toasted sourdough & the browned sausage mixture in a large mixing bowl. Add in the chopped sage, thyme & rosemary, & season with 1/2 teaspoon kosher salt. Pour the eggs over top. Toss well to combine. Pour in 1 cup of stock & toss well to combine. If the stuffing seems too dry, add in 1 more cup of stock & toss well to combine. Repeat once more if needed.
Transfer the stuffing mixture to the prepared baking dish. Bake at 350 degrees, uncovered, for 45-55 minutes, until the top of the stuffing is crispy & browned. Serve immediately.
Adapted from https://playswellwithbutter.co...
Maple Bacon Roasted Butternut Squash {Paleo}

Ingredients
(5) cups butternut squash about 1 large cut in 3/4” cubes
(8) slices nitrate free bacon
(1 1/2) Tbsp cooking fat rendered bacon fat or other preferred cooking fat
(1/2) tsp sea salt
pinch black pepper
(3) Tbsp pure maple syrup
(1) tsp cinnamon
Directions
Preheat your oven to 425 degrees and line a large baking sheet wth parchment paper (I double lined mine)
If using bacon fat* to roast the squash (optional) cook the bacon first: heat a large heavy skillet over medium high heat and cook bacon until 2/3 of the way done, then remove to drain on paper towels and set aside.
Toss butternut squash with 1 1/2 Tbsp of bacon fat (or other cooking fat) and the sea salt and pepper. Arrange in a single layer on the parchment lined baking sheet, and roast for about 25 minutes - until softened but not yet browning.
Meanwhile, cut or break the partially cooked bacon into pieces, then whisk together the maple syrup and cinnamon in a small bowl.
After roasting squash 25 minutes, remove from oven and sprinkle the bacon over the top. Drizzle the maple syrup/cinnamon mixture evenly over squash and bacon, then very gently stir to combine and rearrange squash and bacon in a single layer.
Return to oven and roast for another 10-15 minutes, checking after 10 to make sure the bacon and maple syrup aren’t burning.
Once the bacon is crisp and squash is golden brown, remove from oven. Serve warm and enjoy!
from www.paleorunningmomma.com...
Green Beans with Jowl Bacon
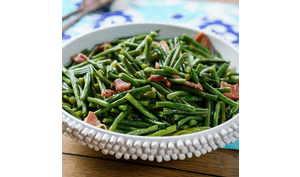
Ingredients
- (1 lb) fresh, trimmed green beans
- (1/2 cup) white onion, diced
- (1) clove garlic
- (1 lb) jowl bacon
- (1-2 cups) chicken stock
- (1 tbsp) butter
- salt and pepper to taste
- (1 tsp) red pepper flakes (for optional heat)
Directions
In dutch oven or similar pan, fry jowl bacon until crispy. Remove from heat, let cool to the touch, then chop into small pieces. Leave drippings in the pan.
Add onion to jowl drippings and cook until translucent. Add garlic and cook 3 minutes more.
Add butter, chopped jowl, and chicken broth to the pan. Bring to a boil and add in optional red pepper flakes. Add in green beans.
Turn heat to low. Cover and simmer for 1 hour. Season with salt and black pepper.
Adapted from https://divascancook.com/south... Acorn Squash with Maple Bacon Drizzle
Roasted Acorn Squash with Maple Bacon Drizzle
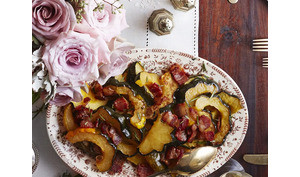
Ingredients
- (2) large acorn squash (about 4lbs), seeded and sliced into 1 inch wedges
- (1/4 cup) butter, melted
- (2 tbsp) dark brown sugar
- (1 tsp) salt
- (5) bacon slices, chopped
- (1 tbsp) fresh rosemary leaves, chopped
- (1/2 cup) maple syrup
- (2 tbsp) red wine vinegar
- Fresh rosemary leaves and black pepper
Directions
Preheat oven to 400°F. Line 2 baking sheets with parchment paper. Combine butter and next 2 ingredients. Coat squash with butter mixture; arrange on baking sheets in a single layer. Bake 20 minutes; turn squash over, and bake 10 more minutes or until tender.
Meanwhile, sauté bacon in a medium nonstick skillet over medium heat until crisp. Remove bacon with a slotted spoon. Drain drippings, reserving 1 tablespoon in skillet. Cook rosemary in hot drippings 1 minute. Stir in syrup and vinegar and cook, stirring often, 5 minutes or until reduced by almost half. Arrange squash on a serving platter and drizzle with warm maple mixture.
Crumble reserved bacon over squash and sprinkle with additional rosemary leaves and pepper. Serve warm or at room temperature.
Adapted from https://www.countryliving.com<... Chicken Stock
(use as a base for gravies, casseroles, sauces and more)
Soups
Basic Chicken Stock
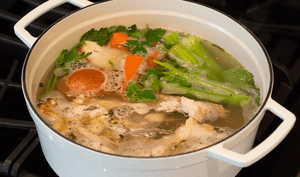
Ingredients
- (2) chicken backs
- (4) chicken feet (optional for added collagen)
- (3) large onions, chopped
- (4) stalks celery, chopped
- (4) large carrots, peeled and chopped
- (4) cloves garlic, minced
Directions
Add all ingredients to a large stockpot. Cover with filtered water, about 2-3 inches above chicken backs.
Bring to a slight boil, and then turn heat down to medium low. Simmer for at least 8 hours, and up to 24 hours. Skim and toss any scum that rises to the top.
When done, strain through a fine mesh strainer. Refrigerate stock and use as a base in soups, gravies, sauces, casseroles and more.
______________________________________________________
Chorizo Chili
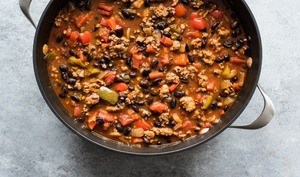
Ingredients
- (1 lb) pork chorizo
- (1 lb) ground pork
- (1 tsp) ground cumin
- (1 tsp) coarse salt
- (1/2 tsp) oregano
- (1/4 tsp) black pepper
- (1 1/2 tbsp) olive oil
- (1) large onion, diced
- (2) large red bell peppers, seeded and diced
- (1 tbsp) garlic, minced
- (1/2 tsp) red pepper flakes
- (4) 15 oz cans black beans, drained and rinsed
- (2) quarts homemade beef broth
- (2) 15 oz cans diced tomatoes
- (1) 6 oz can tomato paste
- (2 tbsp) chili powder
- to serve: cilantro, cheese, jalapenos, limes, sour cream
Directions
In a large bowl, add chorizo, ground pork, cumin, salt, oregano and black pepper. Mix together until well combined.
In a large pot or Dutch oven (5 quarts or larger) over medium-high heat, add meat and brown until cooked through, about 8-10 minutes. Drain off grease, transfer meat to a large bowl and set aside.
In the same pot, add the cooking oil, onions and peppers. Reduce heat to medium-low and cook for 15 minutes, stirring occasionally, until the veggies are soft and the onions have begun to caramelize.
Add garlic and red pepper flakes. Cook for 1 to 2 minutes, until garlic is fragrant.
Add black beans, beef broth, diced tomatoes, tomato paste, chili powder and the cooked chorizo and ground pork. Mix together and bring to a boil. Reduce heat to simmer and cook for 1 hour, stirring occasionally, until the liquid reduces to your liking.
Taste and season with salt and more red pepper flakes as needed. Serve with cilantro, cheese, jalapenos, sour cream and fresh limes.
Adapted from https://www.isabeleats.com Hen Chicken 'n' Dumplings
Pastured Chicken 'n' Dumplings
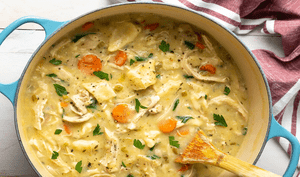
Ingredients
- (1) whole chicken
- (6 tbsp) butter
- (2) large yellow onion, diced
- (3) large carrots, peeled and diced
- (3) stalks celery, diced
- (4) cloves garlic, minced
- (6 tbsp) all purpose flour
- (2 cups) whole milk
- (2 quarts) chicken broth (from cooking the stew hen)
- (1 tbsp) fresh thyme
- salt and pepper to taste
homemade dumplings:
- (2 cups) all purpose flour
- (1 tbsp + 1 tsp) baking powder
- (1 tsp) black pepper
- (1 tsp) salt
- (1 tbsp) fresh thyme
- (3/4 cup) whole milk
- (4 tbsp) butter, melted
Directions
Place chicken in large stock pot and cover with water. Bring to a boil, then turn heat down to medium low and simmer for 2 hours. Take a fork to the breast meat. If meat easily shreds, the chicken is done. If not, continue to simmer until breast meat is fork tender.
Once meat is tender, remove chicken to cool and strain broth through a fine mesh strainer. Pick chicken and discard bones. Set aside chicken and broth.
In a large heavy bottomed pot (like a dutch oven), melt butter over medium-high heat.
Add onion, carrots and celery. Cook for 5 minutes, until vegetables being to wilt. Add garlic and cook for 1 minute more.
Add flour and stir to combine. Cook for 1 minute. Add milk and about 2 quarts of the chicken broth and quickly stir to combine.
Bring to a boil and add chicken, thyme, black pepper and salt. Let soup simmer, uncovered, while you make dumplings.
In a large bowl, whisk together flour, baking powder, pepper, salt and thyme. Make a well in the center of the flour mixture and pour the milk and butter into the center of it. Using a wooden spoon (or rubber spatula), stir together until dough ball forms. If your dough seems too dry, you can add an extra tablespoon of milk.
Using a large sized cookie scoop, scoop dough and drop directly into the simmering soup. Place them around the pot, not all in the same place.
Once all dumplings have been added, gently press them down so the soup runs over just the tops of them.
Place the lid on your pot and lower the heat a little to a low simmer (you don’t want the bottom of the soup to burn but also want the soup to still be simmering to cook the dumplings).
Cook for 15 minutes, gently stir the soup/dumplings and then cut one dumpling in half to make sure they are cooked through.
If the dumplings are cooked through, serve hot! If not, cook an additional 2-3 minutes and check again.
Adapted from https://thenovicechefblog.com<... this link to learn how to render your own lard. It's so simple! --> How to Render Lard
Desserts
Leaf fat refers to the fat found around the kidneys and other organs. It is what is typically used for baking as it has little to no pork flavor.
Back fat refers to the fat from the outside of the pigs body. It has a more distinct pork flavor and is best used for savory dishes and cooking.
Leaf Lard Pie Crust
(1 single pie crust. Double recipe for a double crust pie)
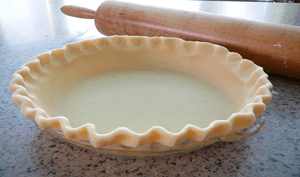
Ingredients
- (1 1/2 cups) all purpose flour
- (1/2 cup) leaf lard
- (3-4 tbsp) cold water
- pinch of salt
Directions
Stir together flour and salt. Cut in lard until you have a crumbly mixture.
Add just enough water to make it come together into a dough.
Pat into a flat disk and wrap with plastic wrap. Chill at least a half hour.
Roll into a thin circle and fit into your pie pan.
For the flakiest crust, put the crust lined pie plate back in the refrigerator for another 15 minutes. Or go ahead and proceed to bake according to your pie filling's instructions.
Blind Baking the Crust: To bake the pie shell without fillings, preheat oven to 425°F.
Prick the crust a few times with a fork, then line with parchment paper or foil and fill with pie weights or dried beans. Bake 12 minutes.
Carefully remove paper or foil and weights then bake 8 to 10 minutes more for a partially baked crust, or for a fully baked crust 10 to 12 minutes longer until golden brown.
Adapted from https://cookingwithcarlee.com<... Chocolate Chip Cookies
Lard Chocolate Chip Cookies
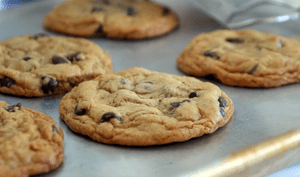
Ingredients
- (3 cups) wheat flour
- (2) eggs
- (1 cup) chocolate chips
- (3/4 cup) brown sugar
- (3/4 cup) cane sugar
- (1/2 cup) melted butter
- (1/2 cup) melted leaf lard
- (1/2 cup) maple syrup
- (1 tsp) salt
- (1 tsp) baking powder
- (1 tsp) vanilla extract
Directions
Mix flour, salt, sugar, and baking powder in one bowl.
Melt butter in small saucepan. Pour into a large bowl bowl.
Melt lard in same saucepan. Pour into butter bowl. Pour maple syrup into butter and lard bowl.
Let the mixture cool down, then mix in the sugar to the liquid mix.
Gently mix eggs into the liquid batter.
Slowly add flour to the liquid mixture, stirring it in gently.
When all dry flour is gone, leave batter in the fridge for 30 minutes.
Preheat oven to 350. Spoon batter onto a greased or lined cookie sheet.
Bake cookies for 13 minutes. Let cookies cool for at least 30 minutes before serving.
Adapted from https://greenmarshmellow.com/<... Covered Bacon Bites
Chocolate Covered Bacon Bites

Ingredients
- (1 lb) smoked bacon
- (1 cup) semi-sweet chocolate chips
- (2 tsp) coconut oil
- (2 oz) white chocolate candy melts
- optional coatings: chopped nuts, toffee bits, orange zest, sea salt, toasted coconut, red pepper flakes
Directions
Preheat oven to 400F. Align bacon in a single layer on rimmed baking sheets. Bake in preheated oven 15 - 20 minutes until crisp. Remove from oven and transfer bacon to a baking sheet lined with paper towels and cool. Cut bacon into 2-inch pieces, set aside. Remove paper towels from baking sheet and line baking sheet with wax paper.
Place chocolate chips and coconut oil in small saucepan on low heat, stirring until melted. Dip bacon in melted chocolate and allow excess chocolate to run off (if adding coatings other than white chocolate candy melts, immediately sprinkle them over bacon after dipping in chocolate) then transfer to wax paper lined baking sheet, aligning coated pieces in a single layer. Transfer chocolate coated bacon to refrigerator and allow to chill until chocolate has set, about 15 minutes.
Place 2 oz white chocolate candy melts in a small saucepan. Heat on low until melted. Transfer mixture to a small resealable bag, and cut a small tip off of one corner. Drizzle melted white chocolate coating over chocolate covered bacon. Transfer to refrigerator until white chocolate has set. Store in refrigerator in an airtight container.
Adapted from https://www.cookingclassy.com/... class="ql-cursor">


